Photo Credit: Purple Slog via Flickr CC
Want to learn the basics of setting up a Cisco RV32X series router? Today I’ll be working with a RV320 Gigabit Dual WAN VPN router, but the steps will be the same for any router that falls in the RV32X family.
Having working knowledge of dealing with Cisco technology is essential for a number of administrators in networking roles. Router configuration on a basic and more advanced level is necessary for networking pros looking to earn their CCNA certification. The CCNA definitely helps your career marketability because it’s more valuable than CompTIA Network+ and it verifies your knowledge of working with Cisco hardware and software, which maintains a major stake in enterprises.

First of all, I’m going to assume you already successfully installed this router. This guide is only for basic configuration, as covering everything would require writing a small book! If you don’t have access to a Cisco router, feel free to follow along in this RV320 emulator. If you’re using the emulator you can’t save changes, but it’s helpful to see what I’m talking about.
Cisco’s configuration software is actually pretty user friendly and the steps are generally quite simple.
Before we begin I want to point out that there are two configuration wizards built into the software. One for basic setup, and one for access rules. However, there are times when you’re going to need to go in and set up services on your own.
How to Configure a Cisco Router
The very first thing you need to do after installing your router, is to log in and change the user name and password. In case you don’t know, you access the router configuration page by typing it’s IP address into a web browser. You’ll need to be connected to one of the LAN ports on the router for this to work.
The default IP on the RV320 is 192.168.1.1
Once you’re in, one of the first things you’ll see is the “Getting Started” page, and right up top is changing the administrator password. Every hacker in the world knows to try admin/admin or admin/password for credentials. So don’t make it easy for them. Go ahead and change this to a more secure password.
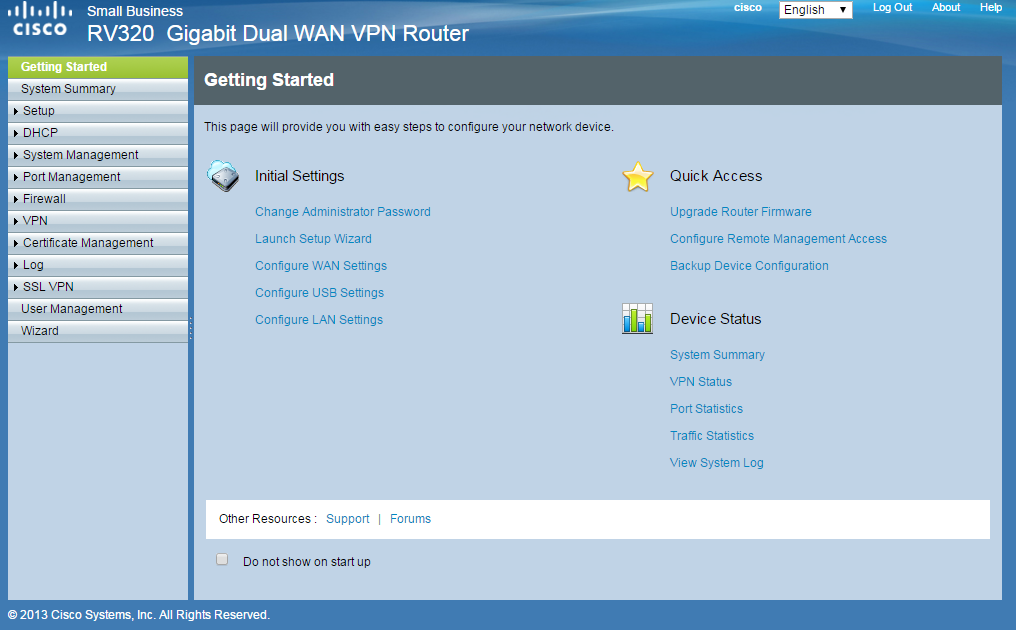
The welcome screen of the RV320
While we’re in here, take note that you can enforce password complexity settings and aging restrictions. I’d recommend changing the password once every 6 months, if not more frequently. Make sure you don’t lose your password. The only way to recover it involves a device reset where you’ll lose all configurations settings.
DHCP and DNS Setup
To configure these settings, click on “DHCP” in the side bar, and then click on “DHCP Setup” directly below. The “Range Start” and “Range End” are what determines your DHCP scope.
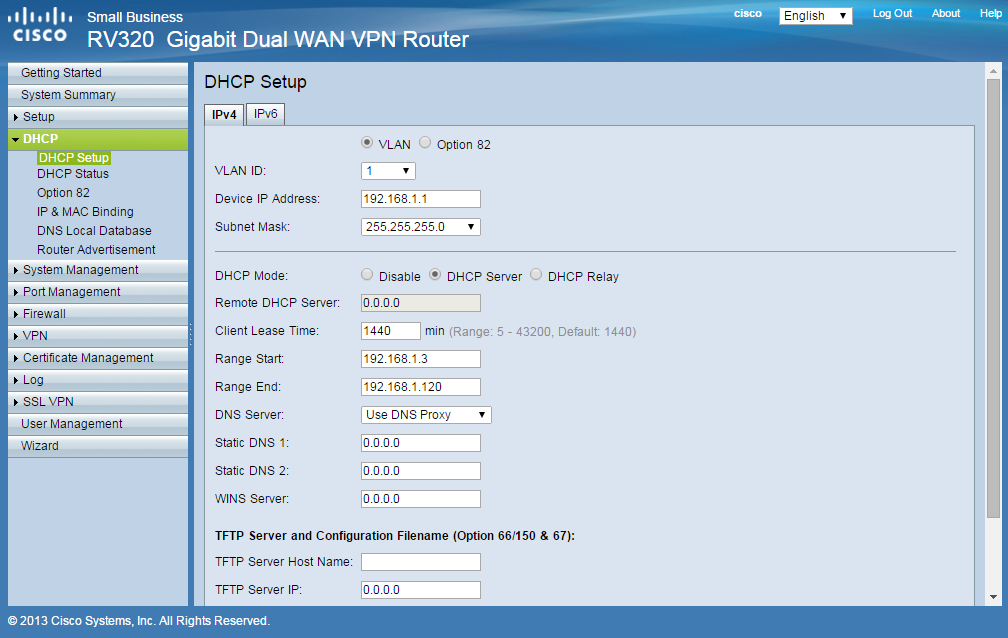
Let’s say your default DHCP scope is 192.168.1.2 to 192.168.1.120 and you want to reserve 192.168.1.3 for a server. You can assign the server that IP statically, but you’ll also need to adjust the DHCP scope or else you encounter connectivity issues when the DHCP server assigns another device the same IP address.
Below this, you’ll see a drop down menu for the DNS server. If you are using your ISP’s DNS, simply select “Use DNS from ISP” (simple, right?). If you have a preferred DNS server, select “Use DNS as below.” From here you can enter up to two DNS server IPs directly below the drop down menu.
Add or Edit an IPv4 Sub Network
Creating multiple subnets can be useful for a variety of reasons. For example, you can separate users from resources they don’t need access to. This is also useful for setting up a DMZ (Demilitarized Zone.)
- Click on the menu tab that says “setup” on the left hand side.
- From here, “network” should be highlighted by default. If you aren’t using IPv6 select the option “Ipv4 only”, otherwise set it to dual stack IP.
- Adding a new subnet is pretty easy, just click on “Add” and type in the address you would like. After you save the new subnet, you can place it on a different VLAN with the tab to the right of the address.
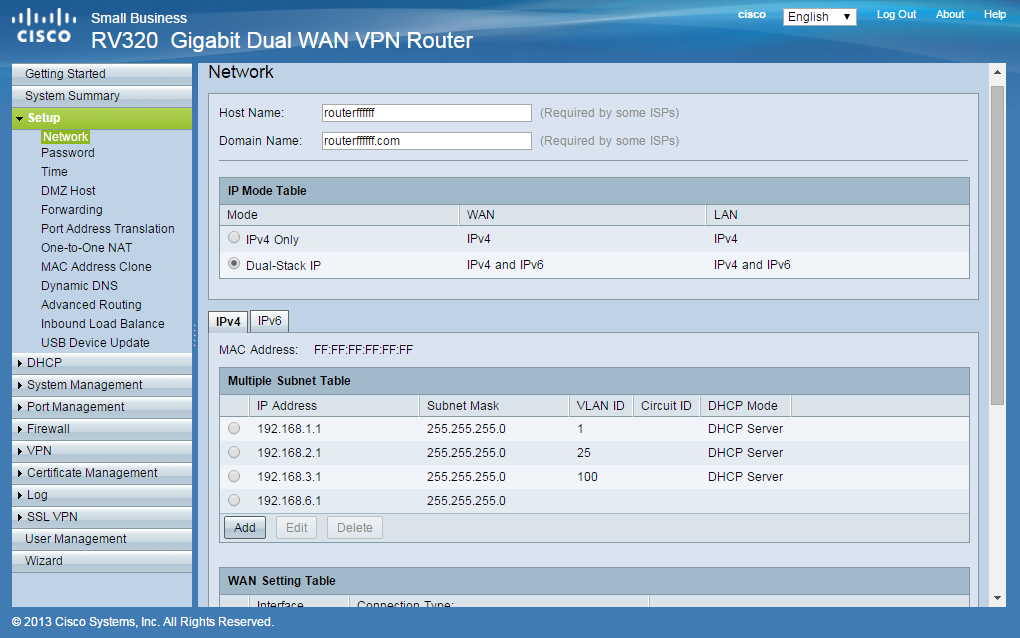
Notice that you can also set the host and domain names here. You can set the host name to whatever you like. If you don’t have a domain name, leave it blank.
Note: IPv6 configurations are also done here. You can change the address, prefix length, and DHCP settings.
While we’re in this part of the configuration software, take a peek at the section of the page that says “WAN Setting Table.” This is where you can configure your WAN IP address if necessary. If you click on either USB1, or USB2, you can also configure fail-over settings for your WAN. This will require a 3G/4G USB dongle, and in the event that something happens to prevent communication on the WAN you normally use, the dongle will take over and maintain Internet access.
VLANS
If you experimented with VLAN assignment in the section above, you may have noticed that there were only 3 default VLAN IDs to choose from. You can actually make up to seven of these on the RV320, here’s how:
- Click on the port management menu
- Click VLAN membership
- Select the enable button
- Click “Add” to create a new VLAN, or select an existing one to edit
You can enable/disable inter VLAN routing here as well. Note that this section only lets you create VLANs, not assign IP addresses to them. To assign an IP address to a specific VLAN, you’ll need to head back to the Setup menu. Click on network, choose an IP address, and then select edit to assign it to whatever VLAN you prefer.
Content Filtering
Content filtering is very easy to implement. You are very much in control of access management. As an administrator you should use this to help minimize malware incidents.
- Click “Firewall” on the menu
- Under general settings you have the option to enable or disable the firewall, stateful packet inspection, SSL VPNs, and more. You can also restrict JavaScript, Cookies, ActiveX, and HTTP proxy servers. To provide exceptions for trusted domains just click “Add” in the trusted domains table.
- Now click on “Content Filter” under “Firewall” on the menu
- Notice at the top of the page you can either block forbidden domains, or accept allowed domains. If you want to really restrict Internet usage, select “Accept Allowed Domains” and then add in your list of acceptable websites. If you just want to keep people off of things like Facebook and YouTube, then select Block Forbidden domains and type in where you don’t want them to go. Note that you can also schedule the time frame that this filter is in effect.

Upgrade, Backup, and Restore
I know, this section is pretty basic. But the fact is that people forget about this. Keep up with Firmware updates, and make a backup after major configuration changes.
Under the system management menu you’ll find a ton of useful settings. For now we’ll stick with the basics. Firmware upgrades should be done with caution. When you select the firmware upgrade section, you will notice several warnings on the page about potential issues that may arise. Be sure to read these and take them into consideration! Everything else you need to know is laid out right on the page. It’s a good idea to check for firmware updates at least monthly.
You can backup and restore router settings via a USB storage device. There’s really not a whole lot to this, and I’m sure that if you’re configuring a router, you don’t need me to walk you through it. Backups can save you from a headache when something goes wrong and you need to restore your customized settings.
Port Forwarding, Dynamic DNS, and other Cool Features
There are plenty of other things you can do with a RV320. Port forwarding, port address translation, dynamic DNS, load balancing, QoS settings, logging…the list goes on. You can see why I said it would take a small book to discuss all of this!
It’s also important to note that I skipped over the Command Line Interface and VPN setup. These could really fill their own blog posts quite easily, so I’d like to save them for another time.